

Table of Contents
- Can You Lay Block Paving Directly on Sand?
- Sharp Sand for Block Paving: Why It Matters
- How Thick Should the Sand Bed Be for Block Paving
- Tools Needed for Laying Block Paving on Sand
- Step-by-Step Process for Laying Block Paving on Sand
- Common Block Paving Installation Mistakes
- Frequently Asked Questions
Last Updated: August 9, 2026
Can You Lay Block Paving Directly on Sand?
Yes, you can lay block paving on sand, but it requires careful preparation and the right type of sand to ensure long-term stability. Sand serves two distinct purposes: as a bedding layer beneath the pavers and as jointing material between them. However, sand alone cannot provide the structural support needed for a durable paving surface, particularly in Norfolk’s variable climate where moisture and freeze-thaw cycles put additional stress on unprepared bases. A properly constructed paving system uses multiple layers: a compacted sub-base of crushed stone or hardcore, a bedding layer of sand, the pavers themselves, and jointing sand between them. Skip the sub-base, and you’re building on an unstable foundation.
Sharp Sand for Block Paving: Why It Matters
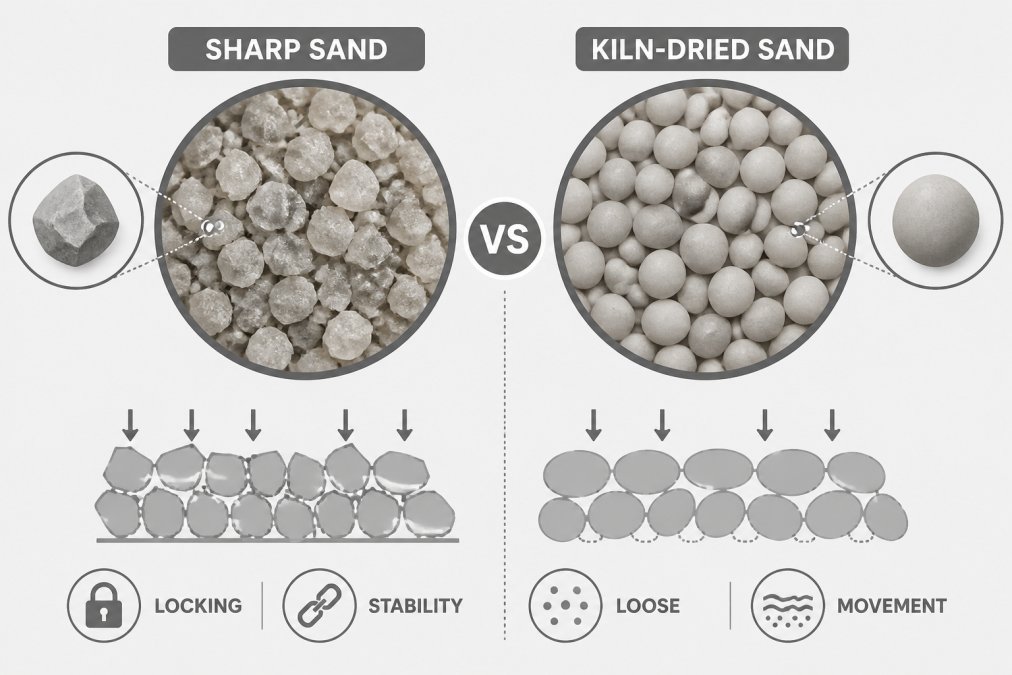
Sharp sand is the correct material for the bedding layer when laying block paving on sand. Sharp sand has angular particles that lock together and resist movement when compacted, making it essential for a stable installation.
The distinction between sharp sand and kiln-dried sand is crucial. Sharp sand has larger, angular grains that create friction and mechanical interlock when compressed. Kiln-dried sand contains finer, rounder particles that slide past each other under load, resulting in pavers sinking and shifting within weeks. Many DIY installers make this mistake because kiln-dried sand is cheaper, but it fails structurally under foot traffic.
For the bedding layer, sharp sand should be spread to a depth of 30-50mm and then screeded level using a straight edge. The sand must be damp but not saturated; moisture helps particles settle, but excess water weakens the layer. After screeding, do not compact the bedding layer with machinery; hand tamping or the weight of the pavers themselves provides the right amount of pressure.
Polymeric sand is a separate product used for jointing, not bedding. It contains resin particles that harden when exposed to moisture, creating a semi-rigid joint that resists weed growth and prevents sand washout.
How Thick Should the Sand Bed Be for Block Paving
The bedding layer of sand for block paving should be 30-50mm thick after compaction. This depth provides enough material to level minor irregularities in the sub-base whilst remaining thin enough to avoid excessive settlement. Most professionals in Norfolk aim for around 40mm as a practical balance.
The thickness depends partly on the condition of the sub-base beneath it. If the sub-base is well-compacted and relatively level, 30mm of sand may suffice. If the sub-base has minor undulations, 50mm provides better compensation. The key is that the sand layer must be screeded level using a straight edge and two screed rails positioned at the same height.
A sand bed thicker than 50mm increases the risk of settlement under heavy foot traffic. A sand bed thinner than 30mm leaves insufficient material to level the sub-base and can cause pavers to rock or tilt. After laying the pavers, the bedding sand will compress slightly due to weight; this is normal. However, if settlement continues weeks or months after installation, it indicates either insufficient sub-base compaction or a sand bed that was too thick.
Tools Needed for Laying Block Paving on Sand
Laying block paving on sand properly requires specific tools to ensure the sub-base is compacted, the sand bedding is level, and the pavers are set correctly. The most essential tools include a plate compactor for compacting the sub-base, a straight edge for levelling the sand, and a rubber mallet for tapping pavers into place.
A plate compactor (also called a vibrating plate compactor) is non-negotiable for preparing the sub-base. Manual tamping is insufficient for achieving the density needed to prevent settlement. Plate compactors can be hired from tool hire shops across Norfolk at reasonable daily rates.
A straight edge or screeding board is used to level the sand bedding layer. This is typically a length of timber or aluminium, at least 1.5 metres long, that is dragged across the sand between two screed rails set at the correct height.
A rubber mallet is essential for tapping pavers into the bedding sand without damaging them. A metal hammer will chip or crack the pavers. The mallet should have a face diameter of 50-75mm and sufficient weight to drive pavers into the sand with 2-3 taps per paver.
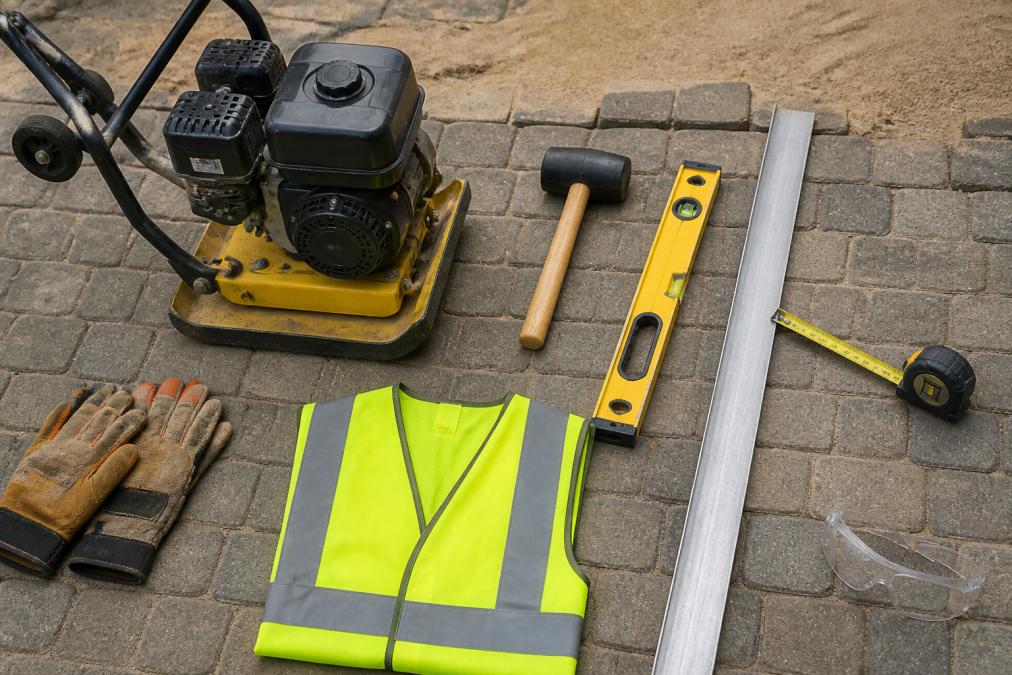
Additional tools include a spirit level for checking that the finished surface is level, a tape measure for checking depths, a shovel for moving sand and aggregate, and safety equipment including work gloves, steel-toed boots, and a high-visibility vest.
Step-by-Step Process for Laying Block Paving on Sand
The correct process for laying block paving on sand begins with preparing the sub-base and ends with jointing the gaps between pavers.
Step 1: Prepare and Compact the Sub-Base
Excavate the area to the required depth, accounting for the thickness of the sub-base (typically 100-150mm of compacted crushed stone), the sand bedding (30-50mm), and the pavers themselves (usually 50-80mm). Spread the sub-base material in 100mm layers and compact each layer thoroughly using a plate compactor. The sub-base must be level and well-drained; water pooling will cause pavers to sink.
Step 2: Set Up Screed Rails
Position two parallel screed rails across the area, separated by 1.5-2 metres. The rails should be set at the correct height to produce a sand bed of 30-50mm when a straight edge is dragged across them. Use a spirit level to ensure the rails are at the same height and have the correct fall for drainage (typically 1 in 100, or a 1cm drop per metre of run).
Step 3: Spread and Level the Sand Bedding
Spread sharp sand across the sub-base between the screed rails. The sand should be damp but not wet. Drag a straight edge across the screed rails, removing excess sand and filling low spots. Do not compact the sand bedding with machinery.
Step 4: Lay the Pavers
Starting at one corner, place pavers onto the sand bedding in the planned pattern. Use a rubber mallet to tap each paver into place until it sits firmly in the sand. Check frequently with a spirit level to ensure the pavers are level.
Step 5: Fill Joints and Finish
Once all pavers are laid, spread jointing sand or polymeric sand across the surface and brush it into the gaps between pavers. If using polymeric sand, follow the manufacturer’s instructions for dampening and curing. Sweep away excess sand and allow the surface to settle for several days before heavy use.
Common Block Paving Installation Mistakes
The most frequent error is skipping or under-preparing the sub-base. Many DIY installers lay pavers directly on thin sand over poor soil, expecting the sand to provide structural support. Within weeks, pavers sink and tilt as the soil beneath compresses. The sub-base is the foundation of the entire system and must be properly prepared.
Another widespread mistake is using the wrong type of sand. Kiln-dried sand or builders’ sand will not provide adequate support for a bedding layer. Only sharp sand has the angular particles needed for mechanical interlock and stability.
Over-compacting or under-compacting the sand bedding causes problems. If compacted with a plate compactor, it becomes too dense, making it difficult to adjust paver levels. If not compacted at all, it settles under traffic and pavers sink. The bedding layer should be screeded level but left loose enough to allow pavers to bed in under their own weight.
Incorrect drainage is another common issue. If the finished paving surface does not slope slightly away from buildings or toward drainage channels, water will pool and seep beneath the pavers, causing frost damage in winter. The fall should be at least 1 in 100.
Failing to use edge restraints allows pavers at the edges to move outward under foot traffic. Edge restraints should be installed around the perimeter of any paved area to contain lateral movement.
Many installers also make mistakes with jointing. Leaving sand joints unfilled invites weed growth and allows sand to wash out. Using polymeric sand incorrectly, applying it to a wet surface or not allowing proper curing time, results in failed joints that crack or wash away.
Laying block paving on sand requires more than simply spreading sand and placing pavers on top. The entire system, sub-base, bedding layer, pavers, and joints, must work together to create a stable, durable surface. Poor preparation leads to sinking, cracking, and weed growth within the first year. For homeowners uncertain about tackling this project themselves, professional paving contractors like KT Lake Paving and Landscaping offer free consultations and can handle the entire process to British Standards, backed by a 10-year product guarantee from Brett.
Frequently Asked Questions
What should I put under block paving?
Block paving requires a proper foundation to prevent settlement and movement. Start with a compacted sub-base (typically 100-150 mm of crushed stone or hardcore), followed by a bedding layer of sharp sand (25-40 mm thick). This layered approach allows for proper drainage whilst providing stability. The sand bed is essential because it allows the pavers to settle evenly and accommodates minor variations in the paver surface.
How thick should the laying course sand be under block paving?
The sand bed for block paving should be 25-40 mm thick when compacted. This thickness provides enough material to allow pavers to bed in properly whilst maintaining structural integrity. Too thin and pavers won’t settle correctly; too thick and you risk uneven surfaces and poor compaction. Always use sharp sand rather than soft sand, as it compacts better and provides superior support for the interlocking pavers.
What is the difference between sharp sand and kiln-dried sand for paving?
Sharp sand has angular grains that lock together when compacted, creating a stable, firm base that resists movement. Kiln-dried sand is softer and rounder, making it less suitable for bedding layers as it doesn’t compact as effectively and can shift under load. For block paving, sharp sand is the correct choice for the bedding layer. Kiln-dried sand may be used for jointing between pavers, but sharp sand provides the structural support your paving needs.
Do you need cement to lay block paving?
Traditional flexible block paving does not require cement for the bedding layer. Instead, it relies on sharp sand to allow slight movement and flexibility, which helps prevent cracking. However, jointing sand (sometimes mixed with polymeric additives) is used between pavers to lock them together and prevent weed growth. Rigid paving installations may use mortar or concrete, but flexible paving on sand is the more common approach for driveways and patios in the UK.


