

Table of Contents
- Why Stones Come Loose: Understanding Causes of Resin Driveway Failure
- Step-by-Step Guide to Repairing Loose Resin Stones
- Resin Driveway Curing Time: What to Expect
- Common Mistakes to Avoid When Repairing Loose Resin Stones
Last Updated: August 6, 2026
Why Stones Come Loose: Understanding Causes of Resin Driveway Failure
Loose stones on a resin driveway indicate underlying problems with the substrate, bonding agent, or installation. Poor surface preparation, dust and debris creating weak bonds between aggregate and binder, is the most common cause, allowing weathering and traffic to displace stones over time.
Inadequate base preparation is another frequent culprit. If the foundation wasn’t compacted properly or shifts due to poor drainage, the entire surface becomes unstable. Temperature and humidity during installation also matter significantly; resin requires specific conditions to cure correctly, and improper conditions create weak adhesive layers that fail under normal use.
Delamination occurs when moisture gets trapped underneath, causing the resin layer to separate from the substrate. In Norfolk’s climate, where moisture levels fluctuate throughout the year, proper drainage and surface sealing are essential. Vehicle weight and impact damage can also dislodge stones, particularly if the underlying resin has already weakened.
Step-by-Step Guide to Repairing Loose Resin Stones
Step 1: Identify and Assess the Damage
Inspect the affected area carefully and gently press on surrounding stones to determine the full extent of the problem. Mark the damaged perimeter with chalk or tape.
Step 2: Clean the Damaged Area
Remove all loose stones and debris. Use a stiff brush to clear away remaining aggregate. For stubborn material, a pressure washer on low setting can help. Allow the area to dry completely.
Step 3: Remove Old Resin and Prepare the Substrate
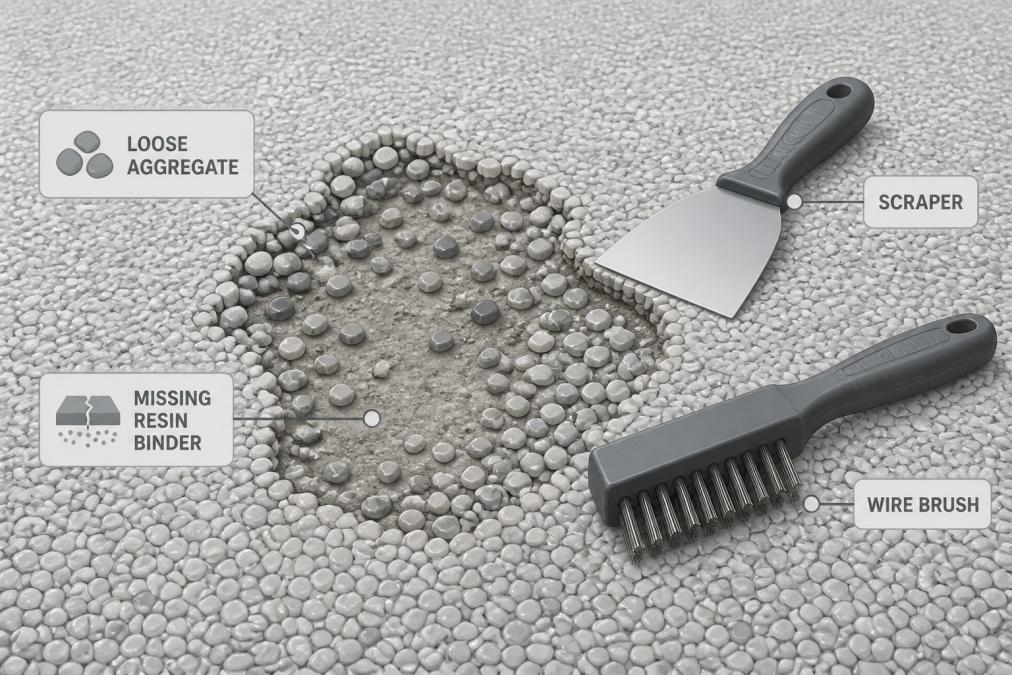
Scrape away damaged resin using a chisel or scraper to expose clean substrate. Use a wire brush to remove residue. The prepared surface must be solid, level, and free of loose material, this step is critical to prevent repair failure.
Step 4: Vacuum and Damp-Clean the Surface
Vacuum thoroughly to remove all dust and fine particles. Follow with a damp cloth to remove remaining dust. Let the surface dry completely before proceeding.
Step 5: Mix Your Resin and Aggregate
Prepare your resin patching compound according to manufacturer’s instructions. Mix only as much as you can apply within the working time, typically 15-30 minutes.
Step 6: Apply the Resin Patch
Pour the prepared resin mix into the damaged area. Use a trowel to spread it evenly, working it into all corners and edges. Slightly overfill the area; excess will be levelled in the next step.
Step 7: Level and Finish
Use a straight edge or trowel to level the patch flush with the surrounding surface. Work quickly as the resin begins to set.
Step 8: Allow Proper Curing
Do not allow foot or vehicle traffic on the repair until it has fully cured. Curing times vary by product and environmental conditions.
Resin Driveway Curing Time: What to Expect
Most resin patches achieve initial set within 4-6 hours, meaning they’re hard to the touch. However, full cure typically takes 48-72 hours before the patch can support light vehicle traffic. Heavy vehicles should be avoided for at least 7 days. Some manufacturers recommend waiting a full 14 days before returning to normal use, particularly in cooler weather or high-humidity conditions.
Temperature and humidity dramatically affect curing speed. Warmer conditions accelerate the process, whilst cold, damp weather slows it significantly. If your repair was done during Norfolk’s typical autumn or winter conditions, expect curing times at the longer end of the range. Avoid washing or applying any sealant to the repaired area during the curing period.
Common Mistakes to Avoid When Repairing Loose Resin Stones
Insufficient Surface Preparation
This is the single biggest mistake. Dust, old resin residue, and debris create a barrier between new resin and substrate. Take time to expose clean, solid substrate, this step determines whether your repair lasts months or years.
Using the Wrong Resin Type
Not all resin products are suitable for driveway repairs. Use a resin specifically formulated for driveways, preferably one matching the original installation.
Ignoring Weather Conditions
Attempting repairs in rain, fog, or very cold weather prevents proper resin adhesion. Plan your repair for a dry period with temperatures above 10°C, ideally between 15-25°C.
Skipping the Curing Period
Allowing traffic on a patch before it’s fully cured ruins the repair. Follow the manufacturer’s curing timeline strictly.
Over-Mixing or Using Old Materials
Resin has a shelf life. Using old, partially cured resin will fail. Mix thoroughly but gently, and use fresh materials from a sealed container.
Applying Too Thin a Layer
A patch that’s too thin won’t bond properly. Ensure the resin depth matches the surrounding surface, with a minimum depth of 10-15mm for durable repairs.
Neglecting Colour Matching
Colour mismatch indicates poor workmanship and affects property aesthetics. If the original driveway has a specific colour or aggregate blend, attempt to match it.
Repairing loose resin stones requires attention to detail and patience, but it’s entirely manageable for homeowners willing to follow the process correctly. The key is treating surface preparation as seriously as the resin application itself. If the damage is extensive or if you’re uncertain about your ability to complete the repair, professional help is available. KT Lake Paving and Landscaping has over 30 years of experience with resin bound driveway repairs across Norfolk and offers free, no-obligation consultations to assess your specific situation. Their Brett Approved Premier Installer status ensures repairs meet rigorous British Standards, backed by a 10-year product guarantee.
Frequently Asked Questions
Why are stones coming loose from my resin driveway?
Loose stones typically result from poor surface preparation, incorrect resin-to-aggregate ratio, inadequate curing time, or movement in the substrate beneath. Temperature fluctuations, moisture ingress, and UV exposure can also weaken the bonding agent over time. Identifying the root cause helps prevent the same failure happening again after repair.
What should I include in a resin driveway repair kit?
A proper resin driveway repair kit includes two-part resin binder, replacement aggregate (matched to your driveway colour), a mixing container, mixing tools, a trowel for application, safety gloves, and a mask. You may also need a pressure washer or brush for surface cleaning, a spirit level to check for delamination, and sandpaper for surface preparation. Ensure your kit contains UV-stable resin suitable for exterior use.
How long does a resin driveway repair take to cure?
Resin driveway curing time typically ranges from 24 to 72 hours, depending on temperature, humidity, and the specific resin formulation. Most repairs can tolerate light foot traffic after 24 hours, but you should avoid vehicle traffic for at least 48 to 72 hours to ensure full structural integrity. Colder temperatures and higher humidity extend curing time, so plan repairs during dry, mild weather when possible.
Is it better to DIY or hire a professional for resin driveway repairs?
Small patches with a few loose stones can be tackled as a DIY project if you follow proper surface preparation and mixing ratios carefully. However, larger areas, widespread delamination, or substrate issues benefit from professional expertise. A professional can assess whether the underlying base is sound, ensure colour matching is precise, and guarantee the repair meets British Standards. If you're uncertain about the cause or extent of damage, professional assessment is worthwhile.


