

Table of Contents
-
Resin Bound vs Resin Bonded Driveway: Which One Are You Installing?
-
Resin Driveway Base Requirements: Getting the Foundation Right
-
The Resin Driveway Installation Process Explained: Step by Step
-
Material Selection Guide: Aggregate Blends, UV-Stable Resin, and Natural Stone
-
Resin Driveway Installation Time: What to Expect from Start to Finish
Last Updated: June 12, 2026
Getting the resin driveway installation process explained correctly from the start is the difference between a surface that lasts decades and one that fails within a year. This guide from KT Lake Paving and Landscaping covers every stage of the process, from sub-base preparation to curing time, drawing on over 30 years of hands-on installation experience across Norfolk. Below, we’ll show you exactly how a professional resin bound driveway is built, what the common failure points are, and how to avoid them.
Resin bound paving is a permeable surfacing system in which natural stone aggregate is coated in UV-stable resin and troweled onto a prepared base to create a smooth, porous surface. It is SUDS-compliant, allowing rainwater to drain through rather than creating runoff, increasingly relevant under current UK planning regulations.
Resin Bound vs Resin Bonded Driveway: Which One Are You Installing?
Resin bound paving mixes aggregate and resin together before application, producing a smooth, UV-stable, fully permeable surface with no loose material. This is the system referenced throughout this guide and the one KT Lake Paving and Landscaping installs as a Brett Approved Premier Installer.
Resin bonded paving applies resin to the base first, then scatters aggregate on top. The result is textured, not porous, and prone to loose stones over time.
|
Feature |
Resin Bound |
Resin Bonded |
|---|---|---|
|
Permeability |
Fully porous |
Not porous |
|
SUDS Compliance |
Yes |
No |
|
Loose stones |
None |
Common over time |
|
UV stability |
High (UV-stable resin) |
Variable |
|
Finish quality |
Smooth, consistent |
Textured, variable |
|
Typical lifespan |
15-25 years |
8-12 years |
According to UK Government guidance on permeable paving and planning permission, driveways over 5 square metres that drain to a road or public area require planning permission unless the surface is permeable. Resin bound meets this requirement. Resin bonded does not.
Resin Driveway Base Requirements: Getting the Foundation Right
Base stability is where most resin driveway installations fail. A resin bound surface is flexible but not structural, if the base moves, the surface cracks; if the base isn’t porous, drainage is nullified.
Sub-Base Depth and Compaction Standards
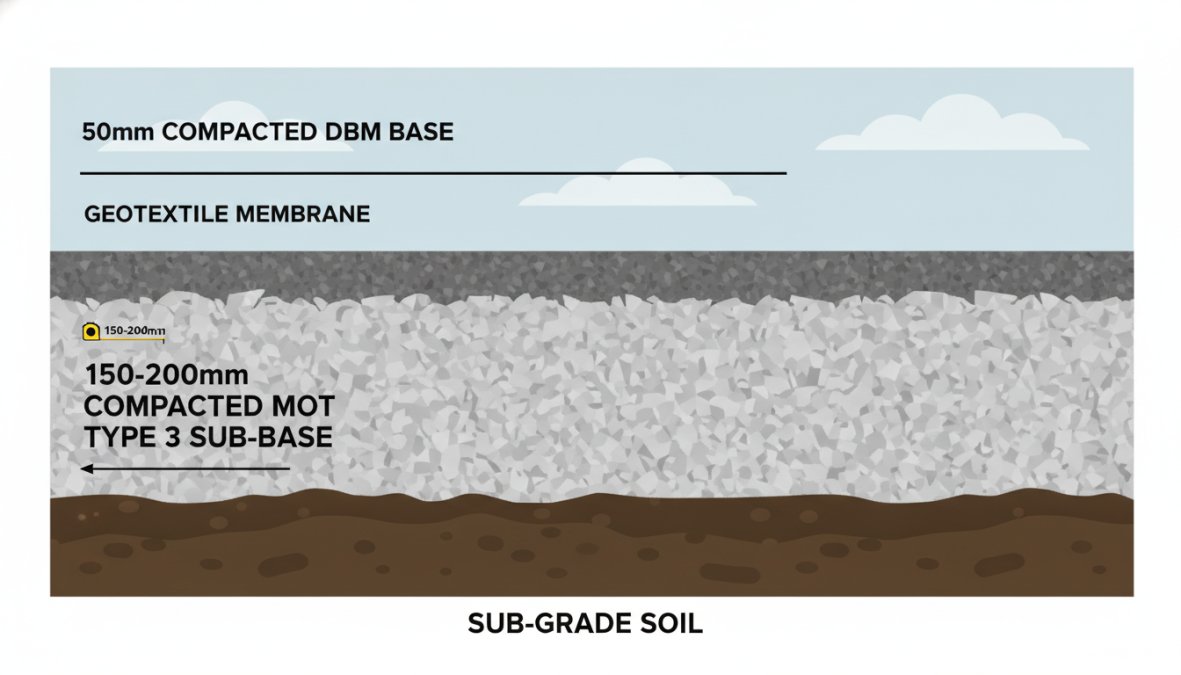
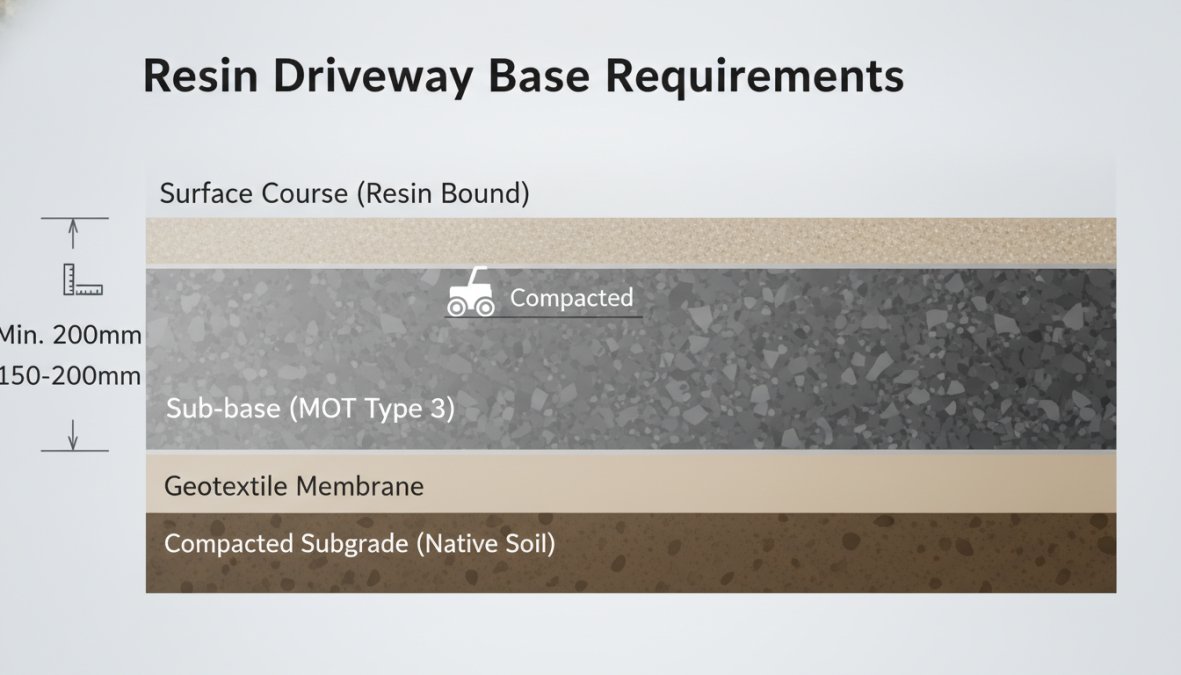
The standard specification is a minimum 150mm compacted depth of MOT Type 3 open-graded aggregate, which maintains drainage through the full construction depth. MOT Type 1 is dense-graded and impedes drainage, undermining SUDS compliance. Compaction must be carried out in layers using a plate compactor, a single-pass approach produces inconsistent consolidation that settles unevenly under vehicle loads.
Where an existing concrete or tarmac base is structurally sound, free of significant cracking, and has adequate falls, resin bound paving can be installed directly on top. A drainage survey at the groundworks stage confirms suitability.
When to Use a Primer and Weed Membrane
A primer coat is applied to porous bases before the resin mix goes down, improving adhesion and reducing delamination risk. On very porous surfaces, a second coat may be needed. Omitting primer to save time is a common mistake, adhesion is compromised and the surface is far more likely to lift within the first two years.
On a new open-graded sub-base, a geotextile membrane beneath the aggregate prevents weed ingress without impeding drainage. On an existing impermeable base, membrane is not required at sub-base level but may be used at edges.
The Resin Driveway Installation Process Explained: Step by Step
The resin driveway installation process explained in full involves three distinct phases after groundworks: site preparation and edging, mixing, and troweling.
Total installation time: 1-3 days depending on area size Curing time before use: 24 hours (foot traffic), 72 hours (vehicles)
Step 1: Site Assessment and Edging Installation
A thorough site assessment establishes falls, drainage routes, and any areas of existing base failure. Falls should be a minimum of 1:80 to move surface water away from buildings. Aluminium or steel edging profiles are fixed at the perimeter before mixing begins; the depth must match the finished surface level precisely, as errors here are permanent.
Resin bound paving must not be installed below 5°C or in wet weather. The aggregate must be completely dry, moisture in the aggregate is the single most common cause of a cloudy, degraded finish.
Step 2: Mixing Resin and Aggregate to the Correct Ratio
Resin bound systems use a two-part polyurethane resin combined in a forced-action mixer first, then dry aggregate is added. A typical 6mm aggregate blend requires approximately 6.5-7.5kg of resin per 100kg of aggregate, but the manufacturer’s exact specification must be followed. Under-resining causes stone shedding; over-resining destroys permeability. Drum mixers, paddle mixers, and manual mixing are not acceptable, they don’t produce a consistent coat on each stone.
Step 3: Troweling and Achieving a Consistent Finish
The mixed material is spread with a steel float to a consistent depth, typically 15-18mm for a 6mm aggregate, with no ridges, thin spots, or aggregate clumping. Each batch must be blended into the previous section before the resin begins to set; poor joins show as visible colour and texture variations. Trowel angle and pressure affect final texture, and experienced installers adjust technique based on aggregate size and ambient temperature.
SUDS Compliance, Drainage, and Environmental Considerations
SUDS compliance is a planning requirement for most residential driveways in the UK, and resin bound paving is one of the most practical ways to meet it. A fully permeable surface allows rainwater to pass through the aggregate layer into the sub-base, where it disperses gradually, reducing runoff and localised flooding risk.
According to CIRIA’s SUDS Manual guidance for permeable paving, drainage performance depends on the permeability of the entire construction, not just the surface layer, which is why sub-base specification matters as much as the surface system itself. Resin bound surfaces also support biodiversity by maintaining the natural water cycle, reducing urban heat island effects, and avoiding chemical runoff associated with some alternative materials.
Material Selection Guide: Aggregate Blends, UV-Stable Resin, and Natural Stone
Aggregate selection drives the visual outcome. Common options include:
-
Golden amber blends: warm tones from quartzite and sandstone, popular for traditional properties
-
Silver and grey blends: cooler tones from granite and basalt, suited to contemporary architecture
-
Natural flint: distinctive East Anglian material with high durability and a speckled finish
-
Mixed natural stone: multi-tone blends that complement landscaping and planting schemes
Finer aggregates produce a smoother surface but require more resin; coarser aggregates are more porous and slightly more textured underfoot.
Resin selection is equally important. UV-stable aliphatic polyurethane resin is the correct specification for external use. Non-UV-stable resin yellows and degrades under sunlight, typically within 12-18 months, irreversibly. Any installer offering a significantly lower price should be asked specifically what resin system they are using.
According to Brett Landscaping’s technical guidance on resin bound surfacing, aggregate and resin compatibility must be confirmed before specification. KT Lake Paving and Landscaping works exclusively within the Brett system as a Brett Approved Premier Installer, ensuring compatibility is guaranteed and backed by a 10-year product guarantee.
DIY vs Professional Contractor: A Realistic Cost Analysis
DIY installation is viable for small, low-traffic areas. For driveways, it is rarely the right choice.
DIY installation challenges:
-
Forced-action mixers cost several hundred pounds to hire per day, and mixing errors produce unrecoverable waste
-
Aggregate must be bone dry, which in the UK climate can extend timelines significantly
-
First-time installers almost always produce visible join lines and inconsistent texture
-
Remediation costs typically exceed what a professional installation would have cost
Professional installation advantages:
-
Correct equipment, manufacturer-backed guarantees, and experience managing pot life and batch joins across large areas
-
Workmanship that meets or exceeds British Standards
Groundworks cost is fixed regardless of who applies the resin, sub-base preparation, edging, and drainage require plant hire and excavated material disposal either way. Professional installation costs more upfront and substantially less over a 10-year period when remediation, warranty, and surface longevity are factored in.
Resin Driveway Installation Time: What to Expect from Start to Finish
Day 1: Groundworks Excavation, sub-base installation, compaction, and edging. Typically a full day for a team of two on a standard 40-60 square metre driveway.
Day 2: Surface installation Priming (if required), mixing, and troweling. A 50 square metre driveway takes approximately 4-6 hours to surface once the base is ready.
Curing period:
-
Foot traffic: 24 hours minimum
-
Vehicle traffic: 72 hours minimum
-
Full cure: 7 days
Rain during or immediately after troweling will damage the uncured surface; frost within the curing period prevents proper hardening. Professional contractors plan installation windows around forecast conditions, this process cannot be rushed once the resin is mixed.
Troubleshooting Common Installation Failures
Most resin driveway failures trace back to one of four root causes.
1. Surface delamination The resin layer separates from the base. Cause: inadequate priming or surface contamination before application. Prevention: correct primer specification and a clean, dry base confirmed before mixing begins.
2. Cloudy or discoloured finish The surface appears milky or uneven. Cause: moisture in the aggregate or mixing in wet conditions. This failure is irreversible without full removal and reinstallation.
3. Stone shedding Aggregate comes loose. Cause: insufficient resin, or aggregate added before the two-part resin components were fully combined. Prevention: strict adherence to the manufacturer’s mix ratio and mixing sequence.
4. Cracking Linear or map cracking across the surface. Cause: sub-base movement, insufficient base depth, or installation over a structurally failing existing surface. Prevention: thorough site assessment and correct sub-base specification before any surface work begins.
According to Interpave guidance on permeable pavement construction and maintenance, the majority of permeable pavement failures are attributable to inadequate base construction rather than surface material defects, consistent with what experienced contractors observe in practice.
Choosing the right contractor for a resin bound driveway is as important as the specification itself. KT Lake Paving and Landscaping brings over 30 years of installation experience to every project in Norfolk, working as a Brett Approved Premier Installer with workmanship that meets or exceeds British Standards and a 10-year product guarantee on every installation. Free, no-obligation estimates mean you get a professional assessment of your site before committing to anything. Get started with KT Lake Paving and Landscaping and invest in a driveway surface that performs, drains correctly, and holds its appearance for decades.
Frequently Asked Questions
How long does a resin driveway take to install?
Most resin driveway installations are completed within one to two days, depending on the size of the area and the condition of the existing sub-base. After the resin bound surface is laid, it typically requires 24 hours of curing time before light foot traffic and around 48 to 72 hours before vehicles can use it. Weather conditions, particularly temperature and humidity, can affect curing time, so installations are best carried out in dry, mild conditions.
What are the base requirements for a resin driveway?
A resin driveway requires a solid, stable sub-base to perform correctly and maintain its porous surface over time. The most common approach is a compacted MOT Type 3 open-graded sub-base, which supports SUDS compliance by allowing water to drain through. The depth typically ranges from 100mm to 150mm depending on ground conditions and expected traffic load. An existing tarmac or concrete base can also be used if it is structurally sound, level, and free from significant cracking.
Is a resin driveway installation a DIY-friendly project?
Resin driveway installation is technically possible as a DIY project but is not recommended for most homeowners. Achieving a smooth trowel finish requires practice and speed, as resin begins to cure quickly once mixed. Industrial tools such as forced-action mixers are essential for a consistent resin mix ratio. Errors in mixing, troweling, or sub-base preparation can lead to delamination, surface bubbling, or poor drainage. Professional contractors with experience in resin bound surfacing will deliver a more durable, guarantee-backed result.
What are the most common problems with resin driveway installation?
The most frequently reported resin driveway installation failures include surface delamination caused by a poorly prepared or damp sub-base, patchy or uneven trowel finish from incorrect mixing, and premature cracking linked to inadequate base stability. Colour fading can occur if a non-UV-stable resin is used. Puddle formation suggests the aggregate blend or sub-base is not sufficiently porous. Most of these issues are preventable by using quality materials, correct resin mix ratios, and experienced installers.
What is the difference between resin bound and resin bonded driveways?
A resin bound driveway is created by fully coating each piece of aggregate in resin before laying, producing a smooth, porous surface that is SUDS compliant. A resin bonded driveway applies resin to the base first and then scatters loose aggregate on top, resulting in a rougher texture that is not permeable. Resin bound surfaces are generally considered higher quality, more durable, and better suited to driveways where drainage runoff and planning regulations are a consideration.
How do you maintain a resin driveway to keep it looking its best?
Resin driveway maintenance is straightforward compared to other surfaces. Regular sweeping removes debris that can trap moisture and encourage moss growth. An occasional jet wash on a low setting is effective for deeper cleaning without damaging the surface. Avoid harsh chemical cleaners that can degrade the resin binder. Promptly remove oil or fuel spills to prevent staining. With proper care, a quality resin bound surface can retain its finish quality and low-maintenance appeal for well over a decade.


